Prostar ac
05-29-2017, (Subject: Prostar ac ) 
Post: #1
Prostar ac
I have a prostar 2011 and i have spent 15000 on just ac work . does any one know the problem every thing is new even the bcm. I need some help
replyreply
05-29-2017, (Subject: Prostar ac ) 
Post: #2
RE: Prostar ac
Whats it doing?
replyreply
05-29-2017, (Subject: Prostar ac ) 
Post: #3
RE: Prostar ac
It stops blowing cold but if i turn truck off or pull high pressure off. Or pull fuse it will work for 20 or 30 min
replyreply
05-29-2017, (Subject: Prostar ac ) 
Post: #4
RE: Prostar ac
It is 99% always the thermisters. You are taking it to morons and crooks! - Plain and simple, and if you spent that much, then you are only being a gullable fool!.

The programming in the cab controller on a prostar is designed to suck the money out of you at the stealershits nonstop for the A/C on a prostar! -- You are caught squarely in its grip!.

YOu have 2 solutions ...
1) learn how to replace the thermistors and service it yourself, keeping after it

,... or if you like to tinker with Arduino and are a crazy lunatic that can't leave s%it alone like me ...

2) bypass the crap s%$it cab controller and put an Arduino on it to control it yourself. Here is the one I made for mine...
   

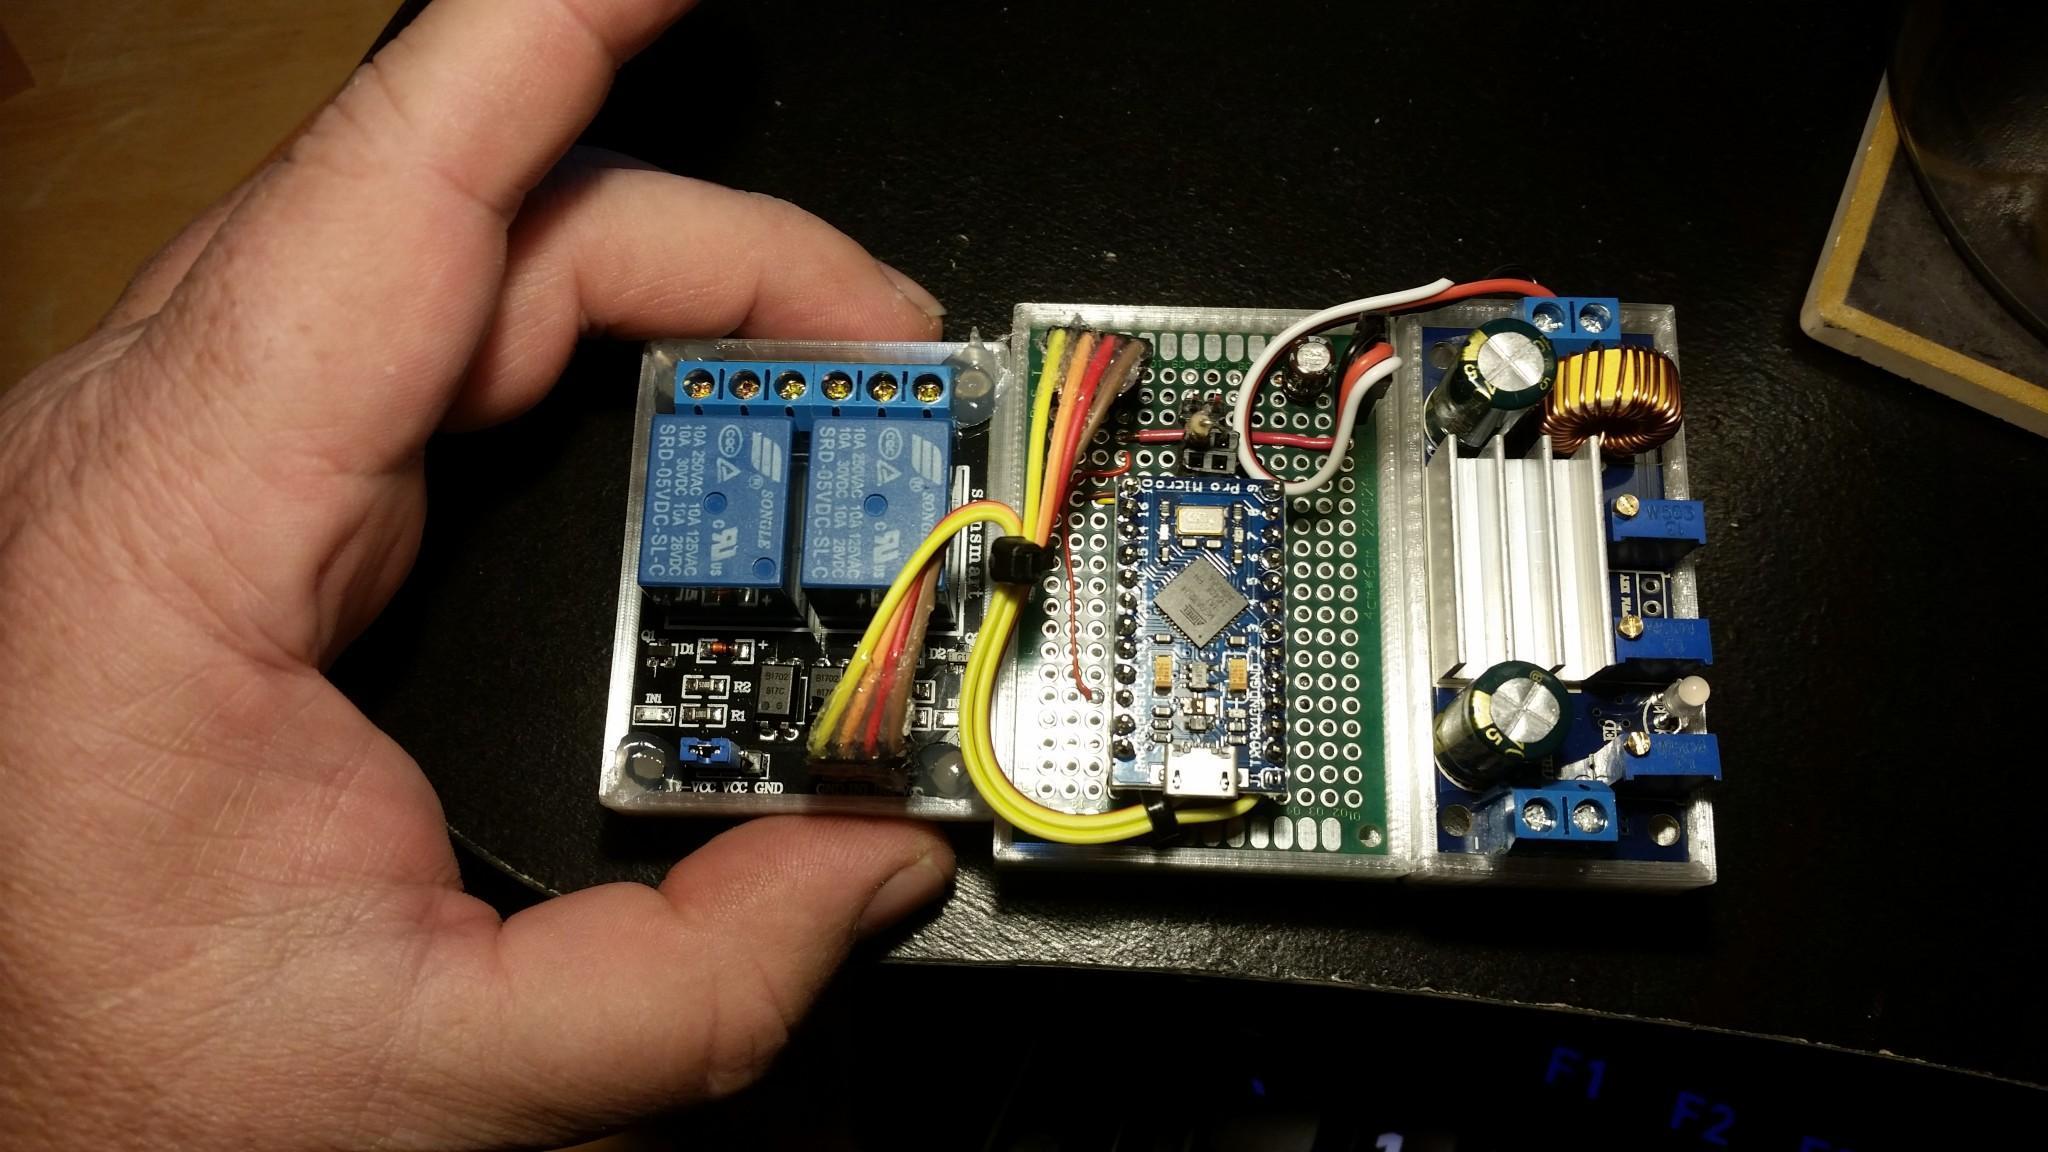
Here is the hookup diagram...
   

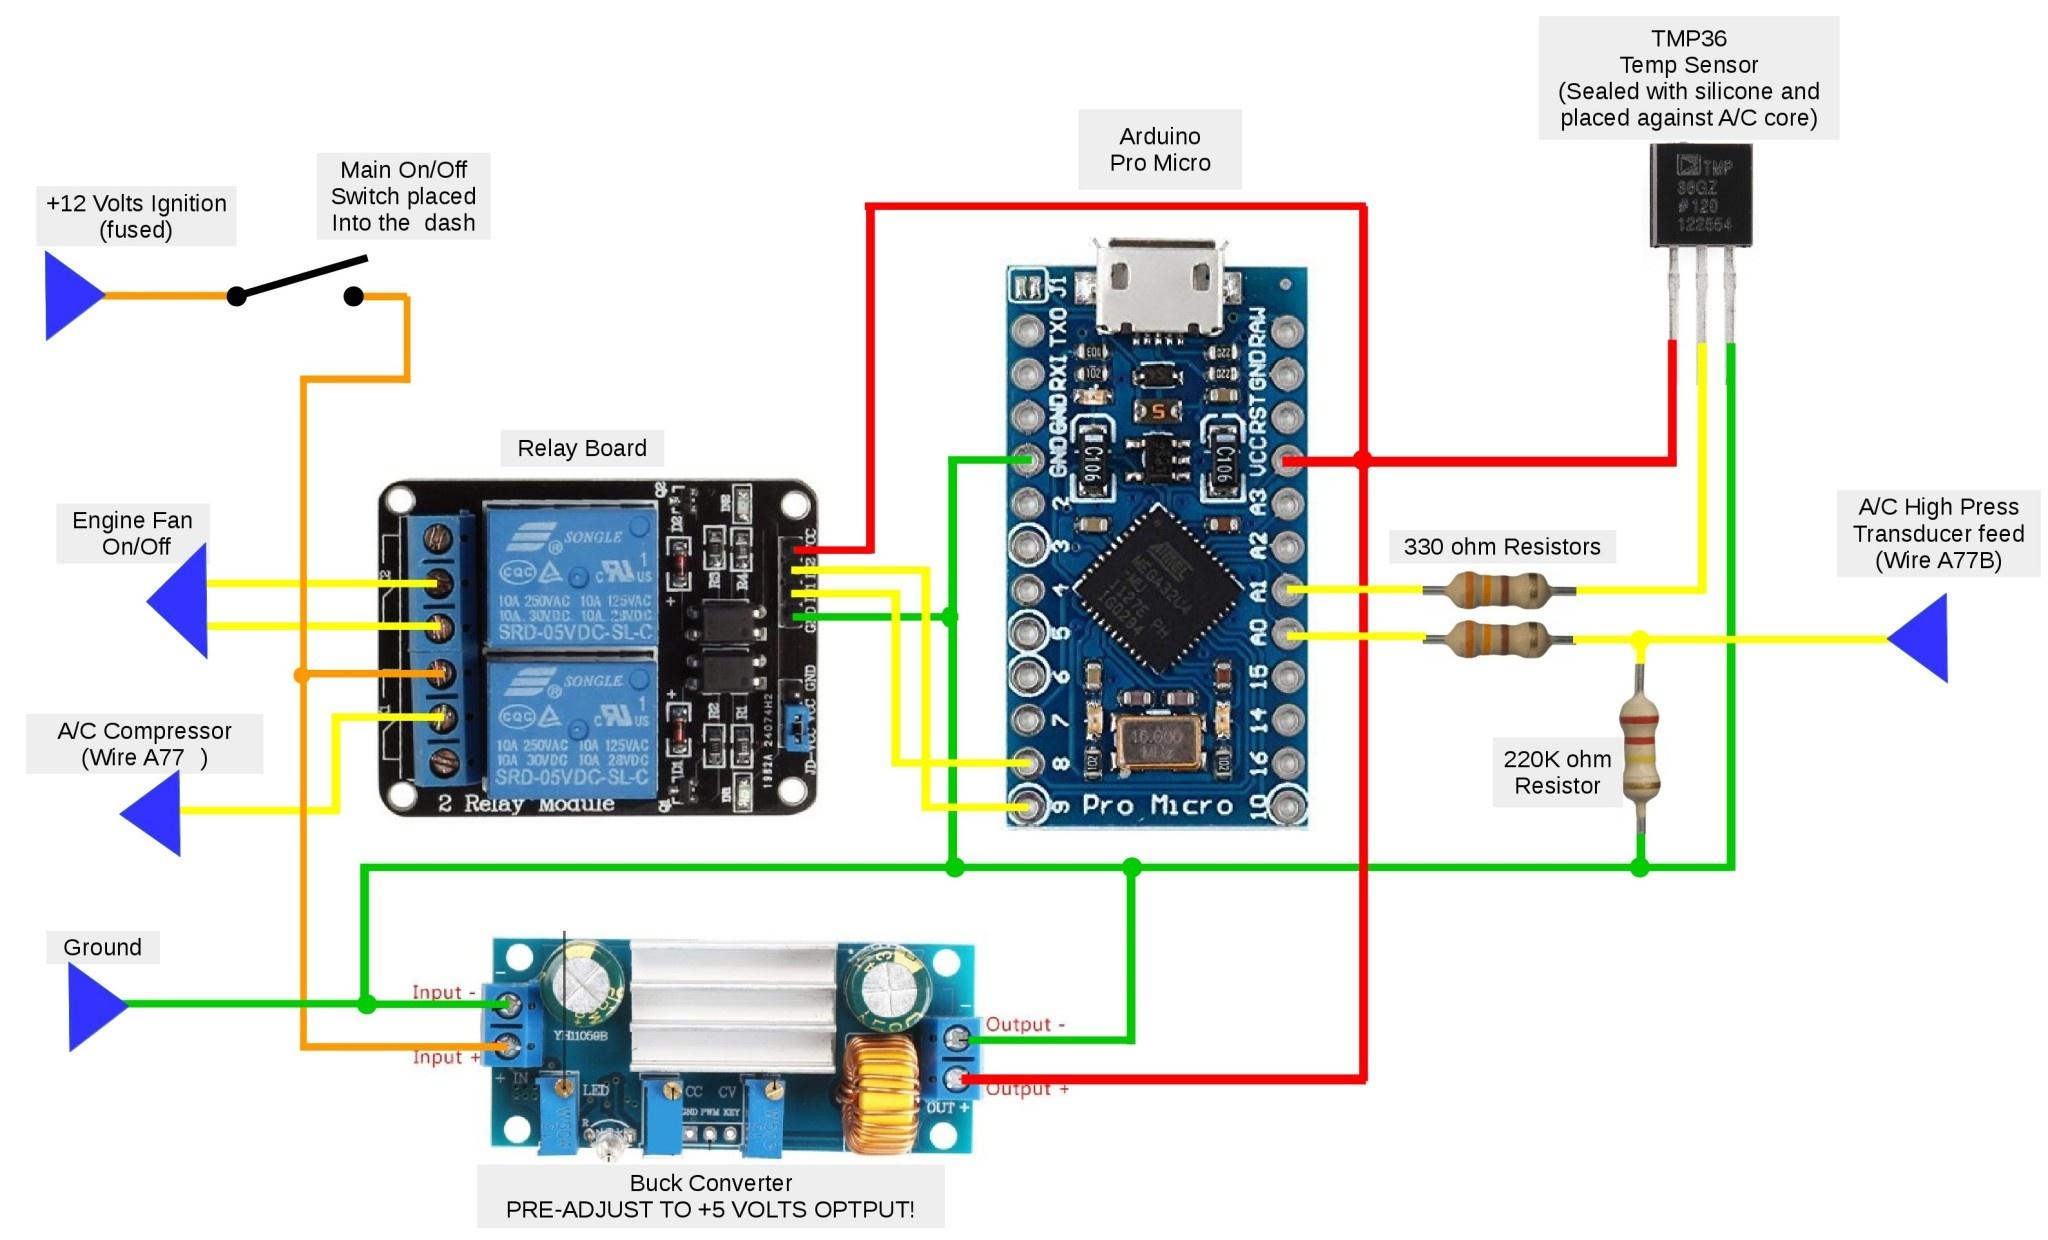
The parts that I happened to have used ...
The pro micro: https://amzn.to/2VcoBHl
Relay Module: https://amzn.to/2URvUiE
Voltage converter: https://amzn.to/2JdnHTG
Temp Sensor I used: https://amzn.to/2H0h8T7


I used my 3d printer to make a nice holder, but a person could also just hot-glue the boards to the backing of a clip-board that has been cut down, and use a terminal strip at its edge ( https://amzn.to/2Vf8gll )for the connections.

* I used a long piece of small 3-conductor wire for the temp sensor that I mounted against the evaporator (the core in the cab of the truck that gets cold). I had to seal the temp sensor from moisture really well for it not to get erratic readings. I just buried it and the soldered wire connection in clear silicone and let it dry. I also used the silicone to also glue it to the evaporator core near the bottom left of it.

* I had to turn the "constant current" adjustment screw on the voltage converter all the way up to max, and i had to adjust the "voltage" adjustment screw on it for +5.0 Volts DC using a volt meter.

Here is the code I am currently running it with. I wrote it myself... Use at own risk! -- Seems to work very well for me, even better than the factory. It will not shut down or fault out unless there is no pressure in the system.

Code:
/*
* Prostar Air Conditioner Arduino Sketch
* 08-09-2017 by Rawze.
* Use at own risk.
*/
#include "Arduino.h"
//##########################################################
//hardware connections ...
#define LED_PIN 6
#define COMPRESSOR_PIN 8
#define FAN_PIN 9
#define PRESS_SENSOR_PIN (unsigned char)A0
#define EVAP_TEMP_PIN (unsigned char)A1
/* Define the hardware pin logic condition for relays. Some relay boards use reversed logic to
* turn on their relays.
*/
#define RELAY_ON false
#define RELAY_OFF true
//##########################################################
/*
* Some Hex Value feedback on input pin 'PRESS_SENSOR_PIN' that were measured while using an
* A/C pressure gauge test set. This list is used for converting/interpolating raw values to
* actual pressures.
*/
#define TABLE_MAX_ENTRIES 20
const int press_table[TABLE_MAX_ENTRIES][2] {
//table structure: {raw value, psi}.
{0x001C,0}, //full vacuum.
{0x0033,14}, //1 atmosphere (14 psi) empty system.
{0x0086,43}, //about 43psi
{0x00BC,70}, //about 70psi
{0x00E6,100}, //about 100psi
{0x0183,175}, //about 175psi
{0x019C,200}, //about 200psi
{0x01AC,215}, //about 200psi
{0x01BC,225}, //about 225psi
{0x0215,250}, //about 250psi 533 91, 75,
{0x0270,325}, //about 325psi 624
{0x02A5,350}, //about 350psi 677
{0x02B5,360}, //about 350psi 693
{0x7FFF,0x7FFF}, //end of table marker.
};
//##########################################################
/*
* Some Hex Value feedback on input pin 'EVAP_TEMP_PIN' that were measured while using a
* temp gun. This list is used for converting/interpolating raw values to
* actual temperature in F.
*/
const int temp_table[TABLE_MAX_ENTRIES][2] {
//table structure: {raw value, degrees F}.
{0x0000,0}, //??.
{0x0072,36}, //about 36-F.
{0x00AD,83}, //about 83-F.
{0x00BC,98}, //about 98-F.
{0x00BF,103}, //about 103-F.
{0x00D3,113}, //about 113-F.
{0x7FFF,0x7FFF}, //end of table.
};
//##########################################################
/* System Settings...
*
* MIN_SYSTEM_PRESSURE: - Below this pressure, the system is assumed to be out of refrigerant.
* The compressor should not run when the system is empty to prevent damage.
*
* MAX_SYSTEM_PRESSURE: - Above this pressure, the system is assumed to be overheated or in
* an over-pressure state. The compressor should not run to prevent damage to the system
* or the compressor.
*
* FAN_ON_PRESSURE: - Above this pressure, the condenser is assumed to be reaching excess
* temperatures and the engine fan should be engaged to lower it.
*
* SAFE_PRESSURE: - At or below this pressure, the system is considered in its "safe zone
* pressure", indicating engine fan assistance is no longer required.
*
* COMPRESSOR_RESTART_DELAY(Milliseconds): - This delay is used to prevent sudden re-start
* of the compressor when an over-pressure condition occurs.
*
* COMPRESSOR_DEBOUNCE_DELAY(Milliseconds): - Prevents the compressor from turning on/off
* too quickly and burning out the clutch.
*
* FAN_OFF_DELAY(Milliseconds): - This delay is used as an additional on-time for the engine fan
* once the system pressure has dropped below the "safe zone pressure". It is used as a de-bounce
* for to prevent excess or frequent on/off cycles.
*
* DE_ICE_DURATION(Milliseconds): - Span of time to prevent re-start of the compressor once the
* evaporater core is below a min temp. NOTE: Compressor debounce delay will be added to this time
* during a re-start.
*
* EVAP_MIN_TEMP(F): - Min temp the core is allowed to get before compressor is shut down.
*
* EVAP_ALLOWED_TEMP(F): - Temp that must be reached before the compressor is allowed to re-start
* after it has been turned off.
*
*/
#define MIN_SYSTEM_PRESSURE 45
#define MAX_SYSTEM_PRESSURE 360
#define FAN_ON_PRESSURE 320
#define SAFE_PRESSURE 215
#define COMPRESSOR_RESTART_DELAY 20000
#define COMPRESSOR_DEBOUNCE_DELAY 5000
#define FAN_OFF_DELAY 25000
#define DE_ICE_DURATION 17000 // 17000 = 22 sec. (de-ice duration(17 seconds) + compressor de-bounce delay(5 more seconds)).
#define EVAP_MIN_TEMP 31
#define EVAP_ALLOWED_TEMP 43
/*
* Enable/Disable the serial port feedback of the compressor hex values. This is only used
* for testing/debugging purposes. It can be Commented out when not needed.
*/
#define TERMINAL_AVAIL
#define STATUS_MSG_INTERVAL 600
//##########################################################
class Switch_T { //Standard Switch Template class by Rawze (08-09-2017).
public:
void animate(uint32_t _now) {
if( m_duration && ((_now - m_start_time) > m_duration) ) {
m_duration = 0;
m_state = !m_state;
}
}
void DelayedOn(uint32_t _now, uint32_t duration){ m_start_time = _now; m_duration = duration; m_state = false; }
void DelayedOff(uint32_t _now, uint32_t duration){ m_start_time = _now; m_duration = duration; m_state = true; }
bool GetState(){ return m_state; }
bool IsBusy(){ return (m_duration > 0); }
bool IsInNonBusyState(bool state){ return ( (m_state == state) && (m_duration == 0) ); }
void Reset(bool state = false) {m_duration = 0; m_start_time = 0; m_state = state;}
void SetState(bool state){m_duration = 0; m_state = state; }
void ToggleState(){ m_state = !m_state; }
private:
bool m_state = false;
uint32_t m_duration = 0;
uint32_t m_start_time = 0;
};
//##########################################################
/*Quick Interpolate a value from range A into range B. by Rawze 05-12-2016.
* Great for conversion of values by way of a lookup table or for scaling
* values up/down, or simply into a different range.
*/
template <typename _T> _T interpolate(_T val, _T i_min, _T i_max, _T o_min, _T o_max ){
float _v=(float)val, _il=(float)i_min, _ih=(float)i_max, _ol=(float)o_min, _oh=(float)o_max;
float i_span = _ih - _il; if(!i_span) return 0; //prevent div by 0.
float o_span = _oh - _ol; if(!o_span) return 0; //prevent div from 0.
i_span = (o_span / i_span);
i_span = _ol + ((_v - _il) * i_span);
return (_T)(i_span);
}
//##########################################################
/* Use a lookup table to find an analog value.
* CAUTION: The routine assumes the table is sort ordered min to max from 0 to
* highest entry down the left hand column.
* Assumed table structure: {raw value, result}.
*/
int GetAnalogVal(const int lookup_value, const int table[][2]){
//create a reference to the table structure.
enum {table_col_left = 0,table_col_right = 1};
//start at the bottom/lowest entry.
int _ptr = 0;
int _upper_left = table[_ptr][table_col_left];
int _upper_right = table[_ptr][table_col_right];
if(lookup_value <= _upper_left) { return _upper_right; } //at or below min range?.
//find the entry that is slightly too high. Skip the lowest, we already checked it.
for (_ptr = 1; _ptr < TABLE_MAX_ENTRIES; ++_ptr ){
//grab the next pair.
_upper_left = table[_ptr][table_col_left];
_upper_right = table[_ptr][table_col_right];
if(_upper_left > lookup_value){ break; } //slightly higher?
if(_upper_left == 0x7FFF || _upper_left == lookup_value ){
return _upper_right; //out of range, or a quick reply in case we got an exact hit.
}
}
//Out of range check just in case we hit the end of the table.
if( _ptr == TABLE_MAX_ENTRIES ){ return 0x7FFF; }
--_ptr; //back up one so we can obtain the lower bounds to interpolate from.
int _lower_left = table[_ptr][table_col_left];
int _lower_right = table[_ptr][table_col_right];
int _entry_min = table[_ptr][1];
int _psi_min = table[_ptr][0];
return interpolate<int>(
lookup_value, //lookup value to scale/convert.
_lower_left, //input range min. one row back from our upper.
_upper_left, //input range max.
_lower_right, // opt range min. one row back from our last result.
_upper_right //opt range max.
);
}
//globals...
//##########################################################
Switch_T CompressorSwitch; //On.Off switch for the A/C compressor clutch. logic true = run the compressor
Switch_T EngineFanSwitch; //On.Off switch for the engine fan. logic true = run the fan.
Switch_T EvaporatorTempSwitch; //On.Off safety switch for the evaporater core to prevent freezing. logic true = in range.
#ifdef TERMINAL_AVAIL
Switch_T SerialTimer; //Trigger for displaying data to the serial terminal.
#endif //~TERMINAL_AVAIL
//##########################################################
void setup()
{
//Setup IO pins...
pinMode(PRESS_SENSOR_PIN, INPUT);
pinMode(EVAP_TEMP_PIN, INPUT);
pinMode(LED_PIN, OUTPUT);
pinMode(COMPRESSOR_PIN, OUTPUT);
pinMode(FAN_PIN, OUTPUT);
digitalWrite(COMPRESSOR_PIN, RELAY_OFF); //apply compressor state.
digitalWrite(FAN_PIN, RELAY_OFF); //apply engine fan state.
//set initial state.
CompressorSwitch.SetState(false);
EngineFanSwitch.SetState(false);
EvaporatorTempSwitch.SetState(false);
uint32_t _now = millis();
//Terminal setup ...
delay(300);
#ifdef TERMINAL_AVAIL
Serial.begin(19200);
Serial.setTimeout(500);
delay(1000);
Serial.print("\n\nReboot!!\n\n");
SerialTimer.DelayedOn(_now,STATUS_MSG_INTERVAL);
#endif //~TERMINAL_AVAIL
}
//##########################################################
//Main program.
void loop(){
uint32_t _now = millis();
delay(300);
//get system pressure.
int raw_sig = analogRead(PRESS_SENSOR_PIN);
int SystemPressure = GetAnalogVal(raw_sig, press_table);
//get core temp.
raw_sig = analogRead(EVAP_TEMP_PIN);
int EvapTemp = GetAnalogVal(raw_sig, temp_table);
// Evaporater Switch logic ...
if(
(EvaporatorTempSwitch.IsInNonBusyState(false)) || //Simply not on yet?
(EvapTemp < EVAP_MIN_TEMP) || //Temp too low?
(EvapTemp < EVAP_ALLOWED_TEMP && EvaporatorTempSwitch.IsBusy()) //Still in recovery?
){
EvaporatorTempSwitch.DelayedOn(_now,DE_ICE_DURATION); //off now, then auto-on after a delay.
}
// ~ Evaporater Switch logic ...
// A/C compressor clutch logic ...
if(SystemPressure > MAX_SYSTEM_PRESSURE){
CompressorSwitch.DelayedOn(_now,COMPRESSOR_RESTART_DELAY); //off now, then auto-on after a delay.
}
else if(SystemPressure < MIN_SYSTEM_PRESSURE){
CompressorSwitch.SetState(false); //off now and set not busy.
}
else if( CompressorSwitch.IsInNonBusyState(false) ){ //no errors or conditions, but still not on?...
CompressorSwitch.DelayedOn(_now,COMPRESSOR_DEBOUNCE_DELAY);
}
// ~ A/C compressor clutch logic
// Engine fan clutch logic ...
if(SystemPressure > FAN_ON_PRESSURE){
EngineFanSwitch.DelayedOff(_now,FAN_OFF_DELAY); //turn on now and set a delay before it can be off again.
}
// ~ Engine fan clutch logic
//Update hardware logic states ...
bool CompressorState = (CompressorSwitch.GetState() && EvaporatorTempSwitch.GetState()) ? RELAY_ON : RELAY_OFF;
bool FanState = (EngineFanSwitch.GetState()) ? RELAY_ON : RELAY_OFF;
// ~ Update hardware pin states
//report pressure to terminal.
#ifdef TERMINAL_AVAIL
if( SerialTimer.GetState() ){
SerialTimer.DelayedOn(_now,STATUS_MSG_INTERVAL);
Serial.print("\n System Pressure: " );Serial.print(SystemPressure);
Serial.print(" Evap Temp(f): " );Serial.print(EvapTemp);
Serial.print(" Cmprsr sw: " );Serial.print( (CompressorState == RELAY_ON) , HEX );
Serial.print(" Fan sw: " );Serial.print( (FanState == RELAY_ON), HEX );
Serial.print(" Evap temp sw: " );Serial.print( EvaporatorTempSwitch.GetState(), HEX );
}
#endif //~TERMINAL_AVAIL
//Send hardware states to pins ...
digitalWrite(COMPRESSOR_PIN, CompressorState); //apply compressor state.
digitalWrite(FAN_PIN, FanState); //apply engine fan state.
// ~ Update hardware pin states
// Object animation routines.
/* Animation routines allow objects to operate separate of main program
* code space, simulating a multi-threading environment.
*/
CompressorSwitch.animate(_now);
EngineFanSwitch.animate(_now);
EvaporatorTempSwitch.animate(_now);
SerialTimer.animate(_now);
// ~ Object animation routines
}
//##########################################################

raw code: https://gist.githubusercontent.com/Rawze...C_v02a.ino

and for anyone looking for the wiring diagram for the truck, here it is as a reference: http://bodybuilder.navistar.com/General/...s08339.pdf

and an update dated 08-18-2020: http://rawze.com/forums/showthread.php?t...1#pid57281


User's Signature: ->: What I post is just my own thoughts and Opinions! --- I AM Full Of S__T!.
replyreply
 Thanks given by: PuroCumminsPower , barf , JMBT , mikealike , rrod , Matt , Sergiu , patricks
05-30-2017, (Subject: Prostar ac ) 
Post: #5
RE: Prostar ac
I have the parts, but no clue on how to do this.... You need a video Rawze, seriously. Or set up a desk in the house, I'll pay $500 to get this issue solved if it works.
replyreply
05-30-2017, (Subject: Prostar ac ) 
Post: #6
RE: Prostar ac
(05-29-2017 )Rvest Wrote:  I have a prostar 2011 and i have spent 15000 on just ac work . does any one know the problem every thing is new even the bcm. I need some help
Wow 15k just on ac repair?? You need to buy all of the tools and learn how to service it yourself i have a prostar myself and yeah they are a painin the butt, i basically replaced ac compressor,termistors, front expansion valve, the accumulator,the cabin filter i bought the vacuum pump to vacuum the system and check for any leaks in all that i probably spend like 500-600 and the 4 cans of freon i did all that myself now the system blowing cold air, freaking morrons of stealerships some times if not all the time guessing what the problem is and still don't fix the problem sorry to hear that u spend tgat much money with that you could of bought the whole brand new system plus tools,little piece of advice like Rawze says if you can do it yourself there's pleny infirmation on the net or youtube Rawze videos
replyreply
05-30-2017, (Subject: Prostar ac ) 
Post: #7
RE: Prostar ac
Wow Rawze, I don't even have a pro star, but that is incredible!! I showed my wife and told her she needs to learn to write code like that!!


User's Signature: Anti-seize EVERYTHING, Except injectors...Use Petroleum Jelly!!!
replyreply
05-30-2017, (Subject: Prostar ac ) 
Post: #8
RE: Prostar ac
(05-30-2017 )RTRUCKING48 Wrote:  
(05-29-2017 )Rvest Wrote:  I have a prostar 2011 and i have spent 15000 on just ac work . does any one know the problem every thing is new even the bcm. I need some help
Wow 15k just on ac repair?? You need to buy all of the tools and learn how to service it yourself i have a prostar myself and yeah they are a painin the butt, i basically replaced ac compressor,termistors, front expansion valve, the accumulator,the cabin filter i bought the vacuum pump to vacuum the system and check for any leaks in all that i probably spend like 500-600 and the 4 cans of freon i did all that myself now the system blowing cold air, freaking morrons of stealerships some times if not all the time guessing what the problem is and still don't fix the problem sorry to hear that u spend tgat much money with that you could of bought the whole brand new system plus tools,little piece of advice like Rawze says if you can do it yourself there's pleny infirmation on the net or youtube Rawze videos

He is not the only one out here that has dropped some coin on these AC units. My next big purchase will be a commercial AC vac unit if this AC fails again on me this year. It is much cheaper in the long run to just redo the system several times a year with the right equipment in my DRIVEWAY. Unless Rawz hold a class and how to do this Andrino stuff, which I am more than open to. I have no desire to drop another few grand on equipment I should not need to own.
replyreply
05-31-2017, (Subject: Prostar ac ) 
Post: #9
RE: Prostar ac
15 grand sounds crazy. Coulda overhauled it 5 times over for that. Rawze you definitely need to make a vidyo on that there contraption. International really dropped the ball with the cab controllers on these trucks.
replyreply
 Thanks given by: Waterloo


NOTE: Rawze.com is not affiliated, nor endorses any of the google ads that are displayed on this website.